Filling the landscape with Solar Utility Nodes.
Open sourcing the solution of small scale electrification.

Saturday, July 27, 2013

Computers are here!

It took about twenty minutes and a five minute lecture from the postman about how I should have asked for a "registered letter" instead of a package, but I finally managed to pick up our computers from the Masaka post office!  It's lucky that I've been monitoring the tracking information religiously, because other than that saying delivered, there was no other way of knowing they had arrived.  Even though we put the physical address of the FSD office as the shipping address, the package was actually delivered to the post office.

Either we paid too much for these computers, or someone from Everbuying fibbed to the Ugandan tariffs board.  But by the time the packages reached me, the postman told me I didn't have to pay any tax on them, that SingPost had already done so!  So fine by us.

Featured here on my desk.

Friday, July 26, 2013

Using a Satellite Dish to Enhance 3G Signal

The inspiration for this project comes from another project undertaken by Duke students last summer: starting an internet cafe in Togo.  The goal is pretty simple, to enhance the signal our modem receives.  A simple fix to this would be even to move the wifi dongle just closer to the tower/in a better line of sight from the tower.  We don't necessarily need the dish and could just use a USB extension to hang the dongle somewhere on the roof of the LYG shop. 

However, we've chosen to go a step further and place the modem on the roof at the focus of a satellite dish that's aimed at the cell tower providing us with our internet service.  This required only some pretty basic stuff, and we got funding for this project from the grant I applied for so we could buy a satellite dish (145,000 UGX/ $58 USD) and 2 1.8 meter USB extensions (30,000 UGX/$12 USD).  The following is more or less a step by step of prototyping:


I underestimated how complicated it is to assemble the frame for a satellite dish.  Much worse than an Ikea bookshelf.

We used the plastic casing that normally points the receiver for a television at the focus of the satellite dish to house the modem and the USB extension.  This way we have an easy thing to clamp onto the holder (which is built to clamp this exact shape) and with some electrical tape and super glue we can seal it pretty well from water.


The glued casing for the modem.

Wrapped with electrical tape to for additional waterproofing.
Mahadi comes to help!

In attaching the satellite dish to the roof, we first nailed a piece of wood to the tin roof (there are wooden beams running under the tin, so each nail ended in a wooden beam) and then nailed the satellite dish's mounting base to this piece of wood.  We didn't use the bolts that come in the mounting kit to attach it because we didn't really have access to the under-side of the roof and nobody was really interested in going to borrow the drill from whoever had it.  It's actually more stable than I was expecting, a pretty solid mounting. 


Our goal.  It's hard to see in this picture, but is in fact quite close to the shop.

Aiming the dish: to maximize speed, the dish should be aimed directly at the cell tower that is your internet service provider.

Installation team! 
Day 2: hooking up the modem.
Where the USB extension passes through the roof.  We wrapped a lot of electrical tape around the wire because even though the part of the roof that we passed it through isn't really sharp (it's kind of a corroded part of the roof, we just hit it with a screwdriver to make the hole), we don't want it rubbing against the side and possibly wearing down.
The modem after being positioned to maximize speed!

The roof is starting to get a little crazy...


We went from averaging about 9 kbps internet speed (which is just unusable internet; most of the time internet pages time out before you can load something) to averaging just over 100 kbps.  The internet certainly isn't as fast as the U.S. or even the research facility near my house, but it exceeds lots of local internet cafes and is certainly usable and solid.

Sunday, July 21, 2013

Upcoming this week: satellite, reflection, and praying for computers

This week we're planning on installing a satellite dish to enhance 3G signal in Lwemodde, an identical situation basically to the one detailed here: http://padmathilaka-wanigasekara.blogspot.com/2012/03/how-to-boost-3g-signal-using-used.html.  This guy even has the same internet provider and as far as I can tell (haven't seen it yet, just heard reports from Mahadi) the same brand of satellite dish as us!

After that, while we have momentum and people on the roof and on ladders, I hope that we'll finish reflection.  Everybody in the youth group seems to be happy that we've taken a break from thinking about it, but hopefully we can do the dish and the reflective wings all in one go and get people excited about maximizing internet and solar yield in the same day!

Lastly, our computers still seem to be traveling their way across Kenya.  This week marks days 15, 16, 17, 18, and 19 from the ship date, so there is an off-chance that they could arrive by Friday.  Keep your fingers crossed!

And lastly, our picture of the week:
Miki doing some light reading on a tea break.  Our manuals are being put to good use!

Friday, July 19, 2013

Malembo Updates

We've been back to Malembo a couple times this week and last, installing more lights (two monsters of lights too, one we had to cross the main road to reach and had to construct a legitimate telephone pole, and the other was just pretty far away), setting up a second measuring circuit, and just generally checking up on things.

All in all, things are going well and Alex's record-keeping is impeccable.  In two days time we'll have been lighting Malembo for exactly a month, so the first round of profits will be paid back to the LYG (Alex is on a monthly payment plan).

A cool surprise from Alex.  He constructed this so he only has to run two lines to the load box instead of two for every phone and it's a much neater operation this way!

Our new lights.

One of the biggest changes is that Mahadi was unable to find the same lights as before, which means we have to deal with both differences in current drawn and light provided.  These lights draw more current and are brighter than the first round of lights that we installed, drawing 220 mA each.  So far, nobody has complained that their light isn't as bright as their neighbors, but we'll have to wait and see what happens.  They still can fit onto the 300 mA fuses that we've been using, so that shouldn't be an issue.  Obviously, in an ideal world the lights would be uniform and standard, but if there's one thing that we will absolutely not be able to prevent once I leave it's circumstances like this, one type of light is unavailable or more expensive so members opt to buy a different one.  The main thing I made sure is that before installing each light we measured its current usage, so hopefully this becomes habit and just as a check each light is properly measured and rated.
Hi ho, hi ho.  It's off to work we go!

Running the wires.

Precarious perches.

Who would we be without our broad fan-base?  Apparently lights-watching is a popular activity in Malembo.
You'll have to look carefully, but our first real power line crosses this road, the main road into Malembo.  It had to be high enough to allow the big trucks that carry fish out of Malembo on a regular basis could pass.

Wire problems.

The power line!

Raising the wire.

Mo' contracts, mo' money!    


Internet and Computers in Lwemodde


I'm afraid I've gotten terribly behind on keeping this blog up to date.  Without Julian here, it's been tough to keep up with everything that has to be done (work in Lwemodde and Malembo, errands in Masaka/occasionally Kalisizo, and the blog) and so this seems to have fallen by the wayside.  With that being said, it's time that there was a proper update about the status of internet and computers in Lwemodde.

We were shipped computers on July 2nd and are awaiting their arrival at the FSD Office (it's a little disconcerting that part of the mailing address contains the phrase "Across from the DFCU Bank and above Pride Microfinance," but it seems to have worked for others in the past).  We placed an order for two netbooks (http://www.everbuying.com/product409483.html) costing $121.49 USD each from a Chinese site called Everbuying.com.  Had everything gone as planned, we would have had the computers right now, but due to a lot of logistical  problems, that ship date was delayed to July 2nd.  (I think I've spent a total of eight hours on the phone with different customer services, and exchanged a total of 87 emails with customer service representatives, but the short version is that we began the ordering process while Julian was still here, and then it took two weeks for them to finally put it through, and at this point the shipping was also messed up so the packages are shipping via flat rate shipping instead of DHL. If you're considering using Everbuying for something in the future, we wouldn't recommend it despite their computers being incredibly cheap.)

So, at this point, shipping was predicted to take between 18 and 20 business days, meaning they should arrive by the 29th.  As of yesterday the package arrived in Kenya, so it's looking doable.  I'm getting incredibly nervous though that the packages won't arrive before my last day in Lwemodde on August 2nd.  For the time being, I've been teaching people how to use a computer with the laptop I brought: http://www.amazon.com/dp/B0085RV13U.  Most members have never used a computer, and those who have have used exclusively really old PCs, the kind that tend to be a dime a dozen around Kampala.

Our internet service comes from Airtel, a phone company, and it's incredibly slow (usually between 0 and 10 kbps, which means you generally have to count to 5 waiting for a page to load, depending on the contents of the page).  However, hopefully once we hook up a satellite dish facing the cell tower we'll be able to increase the speed significantly.  (Mahadi is on his way to Kampala today, so hopefully we'll have a satellite dish ready to install on Monday.)  The device itself that provides internet is a USB stick that you can either insert into a computer or onto a USB port on a router, which is what we will eventually do.

The USB stick contains a SIM card, which you can load money onto the way you would load money onto any phone's SIM card (so by buying an airtime card with a code from a vendor, and then entering a command *155#thecode# either on a computer that's using the internet or on a phone with the SIM card inserted), and then from there you can select which plan to buy online.  The plan we currently have is a 2 GB for one month plan because that's what comes when you buy the router, however with the internet cafe fully functioning we'll buy the unlimited data for one month plan to accommodate demand.

 With internet and my laptop, I've been teaching people about basic internet functions, getting people used to touchpads and typing (which is something I've realized I take completely for granted.  People are the most basic sort of finger peckers, namely the type who aren't used to the QWERTY arrangement and so they have to visually search for each letter.).  This has basically been setting up Gmail and Facebook for all different members, and then also working together on a web site for the Lwemodde Youth Group.  It's amazing how many little tips and tricks, like double clicking and the shift bar, that I find intuitive and people just learning computers don't.  If you want to check out our web site in its early stages, here you go:

Monday, July 15, 2013

Circuitry Lessons: Round II


This past week we returned to class with the Lwemodde Youth Group, having been remiss on reviewing and reinforcing the principles we originally taught during our lessons on power.  Everybody was incredibly thrown off, trying to come back and just remember the functions of components like op-amps and voltage regulators.

It helped a lot to have grant funding finally (I picked up the wad of cash Wednesday morning!) because I could print an English manual (its final version) and a Luganda manual (the as of yet unedited version; Julie has been line editing the typed version this weekend) to have for reference.  The table/components section is the most often referenced, and it doesn't seem like either version has been read cover-to-cover yet, meaning the more wordy sections haven't really been looked at.  It's hard to tell what people think yet though since we do only have two copies.

Our goal with these lessons was to have the group build the same measuring circuit that their box has to place in Malembo (right now, Alex has a multimeter for every time he wants to determine current or voltage).  Our lessons started by walking through the circuit diagram for the measuring circuit, so that it was clear how the circuit functioned and what path was followed by current when different switches were engaged.  This circuit is just a larger version of one of the practice circuits we built with them (a phone battery measuring circuit), but it's been so long since we did that and it is a large circuit that everybody had a lot of trougle walking through the diagram.  (Also: the group saw little reason to build the circuit based on the circuit diagram when all we would have to do is open up their box and copy the circuit layout, i.e.: which pin goes in which hole.  This is a cop-out because to build off a circuit diagram, you understand current flow and connections, to build off an already constructed bread-board you're basically copy-pasting.)

After people felt ok with the diagram, we started building.  A short demo in soldering onto a circuit board and Bbale was a pro.  Most people did practice soldering once, but Bbale really soldered the whole circuit board that we built.

When it came to construction, I had whichever members currently present assemble 3 components at a time using the circuit diagram and think through the function of that piece of the circuit.  Then I would check it and if it was right, Bbale would solder and we'd keep moving.

When we finally got it constructed, the circuit didn't work hooked up to the system in Lwemodde.  And while everyone had developed some level of comfort with building the circuit and soldering, the only way to try and fix it that people could think of was to go back over the diagram and the circuit and try and figure out if something had been skipped.  I tried to teach people how to use the multimeter to determine if a component isn't functioning correctly in the circuit by measuring voltages, testing connections, and measuring resistances, but people weren't super interested in that and it was hard to get everyone to crowd around the box, which is deliberately hooked up in an out-of-the-way place and hard to get more than one person to.  Ultimately, it seemed as though the voltage regulator wasn't functioning right (instead of 12 V as output, this one was delivering maybe 7) and then one of the opamps was blown (LEDs 1, 2, and 5 lit up, while 3 and 4 were dark after we replaced the voltage regulator.  Replacing the op-amp fixed that).  I think one thing that I'm planning on re-emphasizing at some point is trouble-shooting and kind of the basic things to check in a similar situation.

Tuesday, July 9, 2013

Project Development and Capacity Building Grant

Today we finally heard back from a grant that I applied for a few weeks back (actually, submission date was the day Julian left Kalisizo), and we received full funding!  If you are interested in checking out the grant, which incidentally would provide you with a rough sketch of the work I'll be doing for the next four weeks (I realized that today looking on a calendar I have exactly four weeks left until I fly out of Entebbe International Airport.  Time is disappearing.), then you can go to the Project Documents page and see the budget, workplan and application I submitted.  Our response letter can be found here:


The grant is through the Foundation for Sustainable Development, and is only available to people who were placed with host organizations/host families for work by that organization.  It, as it's name suggests, targets sustainable development projects that aim to increase the long-term ability of an organization to deliver a service.  It cannot be used for capital investments (specifically noted on no-nos were computers, which was upsetting, because scoring a high-capital investment like a computer, a router, etc. would have made our job a lot easier), so the work plan that will use the grant funds is focused on the teaching/experimenting aspect of our project. 

Foiled Again!

Screws: bought 20 for 1,000 UGX (or $0.40 USD) in Masaka, unavailable in Kalisizo.

Installing screws on a roof was much more difficult, and the result was more crinkles in the foil than I'd like.  However, the screws are much more solid!  Definitely a necessity.  Raising/lowering mechanism still to come.

Best position to screw in screws from.  We had to bend it so the wing wasn't in the way of the screwdriver.

Maximum occupancy on Ugandan ladders: 2.

We had to gouge out a little bit of the wood in the frame because reattaching the hinge it shifted and was bumping into the frame so it wouldn't extend properly.

Raising and lowering the panel felt much more stable (if still pretty heavy).

Safety rope tying time!

Increasing Solar Yield: Reflection!

One of the first things we noticed with our panel was that the trajectory of the sun and the orientation of the roof leaves a lot to be desired when it comes to intensity and duration of sun exposure.  We lose a fair amount of energy between 8 A.M. and 11 A.M. and then between 3 P.M. and 5 P.M.  These are hours that should be high yield but lots of rays are lost in the poor angles. Hence, our reflection project!  Working on the ground with the panel we experimented with a mirror and with foil, trying to focus the reflection from the sun off of the foil/mirror onto the solar panel.  The ultimate idea was that we would install reflective wings, one on each side of the solar panel, to be raised and lowered depending on the time of day, so in early morning the wing facing just about east would be raised, reflecting early morning rays that would overshoot the panel back onto the panel.  At midday that panel would be lowered, and in the early afternoon the opposite wing would be raised.

Here, I've only drawn the rays that get reflected by the wing so the picture isn't too cluttered.  This diagram shows the panel on the roof, with a wing on either side, one raised and one lowered.  (Note: when a wing is "lowered" it's still not completely lowered because the force that it takes to raise a wing from completely flush with the roof is too much.)
Our on the ground test suggested that close to 900 mA increase in yield follows from using the mirror, and a 600 mA increase in yield follows from using foil (when we were testing, it was a little after 10 A.M.).  For a system that can power 6 additional lights or power 2 additional phones with the margin of increase from foil, we decided that this is worthwhile energy to try and capture.  To buy a mirror the right size would cost between 50,000 and 100,000 UGX and would have to be bought in Kampala, whereas a roll of foil that could make significantly more than 2 wings costs 14,000 UGX at a supermarket in Masaka (those convert to $20 USD, $40 USD, and $5.60 USD respectively).  So we opted for foil on a plywood frame as the cheapest and most easily acquirable option.

The construction and installation of the reflective wings has 3 main challenges: stability, lifting it, and maintaining the reflective surface.

First, to build the reflective surface we used plywood on a mounted wooden frame (our frame wood was incredibly hard and straight, good for our goal of having a totally flat face to spread the foil on, bad for having to saw and nail it).  Before nailing the plywood to the frame, we carefully spread foil over the top of the plywood and then nailed it to the frame, nailing the top of the foil and clamping the folded bit to hold it in place in between the frame and the plywood.  The flatter the frame and the less crinkled the foil, the more rays of sunlight will be reflected onto the panel and not reflected in random directions.

Laying out the frame for the wings.

Folding the foil under the sides of the plywood, so it would clamp in between the plywood and the frame.

After realizing that the nails wouldn't be enough to hold all 3 long strips of foil tight to the wing, we decided to glue the long edges of the foil down to the wood.  Before this, wind easily could have fit into the cracks between the long overlaps, either ballooning the foil out so it got crinkled/was no longer a flat surface, or even ripping the piece.

The finished wing! 
Installation Part #1:

We used the same basic installation plan for the reflective wings that we have been using on solar panels.  The twist here is that instead of bolting the piece of wood that goes on top of the roof to the wing, we attach it via a hinge likeso:
Imagine the purple bit is a hinge.
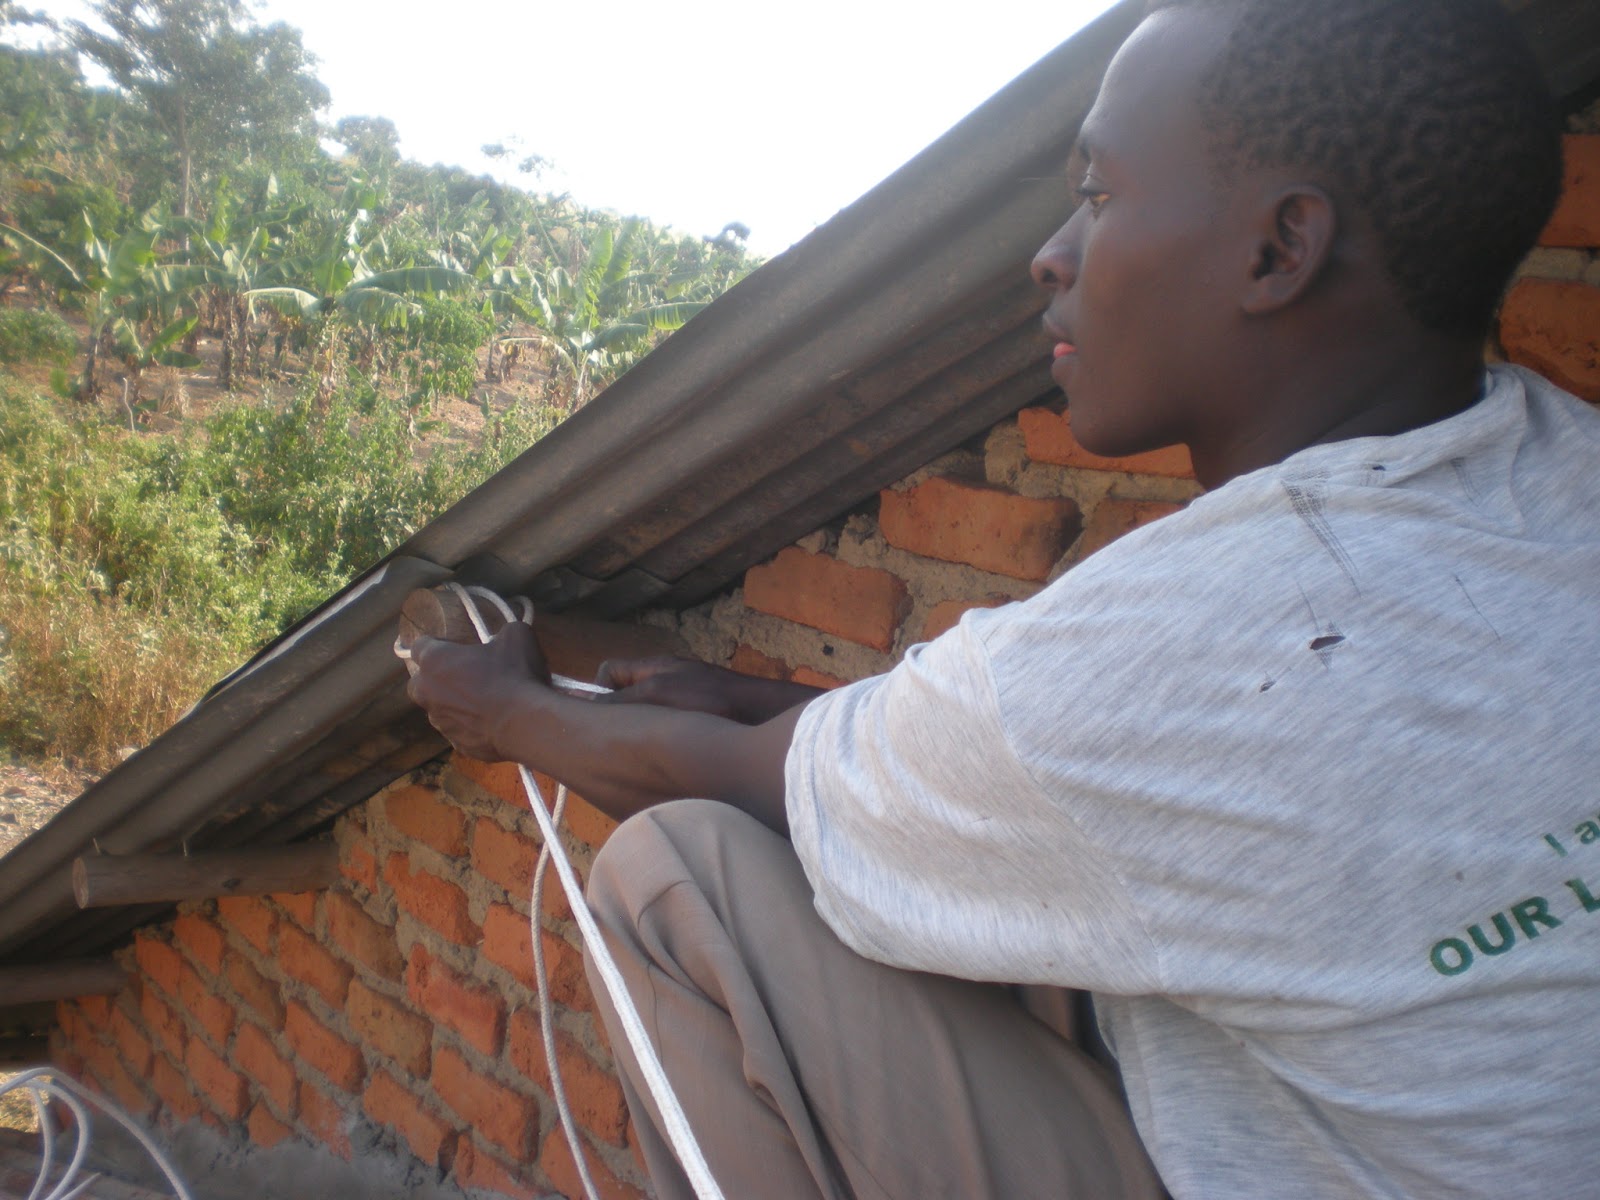
The panel itself is tall, maybe seven feet (see above, where it dwarfs Obama and myself), so stability on the roof, i.e.: the solidity of the mounting system and its ability to hold the wing there is very important.  Holding the wing upright when wind is blowing is similar to holding a sail in the wind because it has such a large area, and if it falls it might smash the solar panel (this is the one that traveled with me from RDU to Boston, was rechecked and then traveled on to Amsterdam, Kigali, Entebbe, Kampala, Masaka, Kalisizo, and Lwemodde before being mounted on this roof).  So stability is something that I've been incredibly nervous about and that we focused on.

Originally, we nailed the hinges to the panel (after we had already put the foil on, rookie mistake).  It was difficult to prevent the foil from crinkling while we were nailing.  However, with the wing on the roof, it was very clear that nails wouldn't be sufficient.  They were too loose and seemed to be close to being pulled out of the wood from the weight of the panel.  We ended up installing as is the first day, but tied multiple safety ropes and decided not to use the mechanism until we could replace the nails with screws.

The hinges.  Notice nails are driven in halfway then bent to hold the hinge in place.  Ultimately, not a great idea. 

Winching up the foil wing very, very carefully!

Obama works his sealant magic on bolt holes.

What a great looking group!

Screwing in the bolts.

Raising the wing for the first time!  A little shaky at the hinges, but all in all not bad!  Just very very heavy.
I'm sure you've noticed that putting a wing on a roof is all good and fine but doesn't really do anything for you if there's no mechanism for raising/lowering it.  This first bit of the process was completed in the last days Julian was here and the next week, we have since upgraded to screws (see post: Foiled Again!), and are in the process of working towards a raising/lowering system.

With a variety of other irons in the fire, we've been kind of distracted from the reflection project, and for whatever reason the Lwemodde Youth Group members themselves have been dragging their feet about it.  They don't seem to be excited about the project (definitely doesn't have the glamor of circuit-building or internet cafes), and so as a result it's been getting pushed back and back.  I think another element of this might be concern about the safety of the panel, although with our safety rope mechanism, even when it's raised and lowered the wing should have no way it could break free and fall on the panel.  This project will probably be one that we continue through the end of my time here as priorities shift.